Planetary Problem Solving
My telescopes are not well-suited for taking pictures of planets. The Dobsonian can’t automatically track objects across the sky, and its focuser tube cannot handle the weight of anything but the smallest of cameras. The AT72EDII refractor is a wide-field scope, and planets appear small with very little visible detail. Add to that, I do not possess all of the necessary camera equipment and software to “do” planets. This post is about how I worked around those limitations one evening to get some decent shots of Jupiter and Saturn.
The Problem
I will often use a cheap 2X Barlow lens to help improve the magnification of planets in the AT72EDII. This doubles the size of the planets at the cost of halving the field of view. It is not an ideal solution, though, as it makes focusing a little more difficult. The scope does not gather a great deal of detail due to its small aperture, and the soft focus resulting from the use of the Barlow compounds the problem.
Furthermore, the Barlow lens arrangement has only worked well with my Mallincam SkyRaider camera. The SkyRaider is a “solar system imager” (also referred to as a “planetary imager”). These types of cameras do not have shutters and can take many pictures very quickly, which is important when trying to get good data to work with on planets. The downside to using this camera, though, is that it is monochrome, so the images have no color. I could use color filters (red, green, and blue) to capture different sets of images, then combine the individual colors into a full-color image; but I do not have the right equipment to ensure that the camera remains correctly oriented between filter changes.

My Canon EOS Rebel T3 DSLR camera takes color pictures. Therefore, the simple solution to get color pictures of planets would be to use the T3, right? Well, not exactly… Taking very short exposures is a problem with the T3 because the camera does not have a “mirror lockup” feature. The mirror inside of a DSLR diverts the light coming through the lens into the camera viewfinder. When a picture is taken, though, this mirror “flips up” to allow the light to hit the imaging sensor–the mirror acts as a shutter. The act of moving the mirror causes the camera to shake slightly, which can blur the details in very short exposures. Since planets are bright, short exposures are needed. The T3 is great for long exposures, but just produces a lot of blurry planet images at high magnification.
The T3 does have a video mode, but this feature is somewhat barebones. It handles most of the exposure settings automatically and has very few user-controllable adjustments. Planets come out as solid-white discs with no surface detail.
So, how did I work around the limitations and problems? It was an ad-hoc solution and is sort of a Rube Goldberg machine of equipment and processes. But, it worked. Speaking of equipment…
The AT72EDII
The Astro-Tech AT72EDII is a doublet refractor that has one FPL53 lens. The FPL53 glass is embedded with fluorophosphate and lanthanum. This formulation helps correct color distortions caused by traditional glass lenses. I’ve written many articles about dealing with this problem with my Orion ST-80 achromat telescope.
The AT72EDII has a focal length of 433 millimeters and an aperture of 72 millimeters. The focal ratio is f/6, which means that it gathers a good bit of light. The small aperture, however, does not gather a great amount of detail on small objects. The main purpose of this scope is to capture wide-field views of the sky, which makes it suitable for viewing and taking pictures of large objects, such as nebulae, star clusters, and some galaxies.
The Optical Train
An “optical train” is the path of components through which light is guided to an imaging sensor, film, or an eye. Components are added to a telescope optical train by attaching them to the focuser tube. Typically, I attach a focal reducer to the tube, and then attach the T3 to the reducer. This arrangement works pretty well for taking pictures of nebulae and star clusters.

The focal reducer reduces the focal length from 433 mm down to 346 mm, and the focal ratio from f/6 down to f/4.8. This widens the field of view and brightens the image. It is ideal for capturing images of very large objects like the Orion Nebula and the Andromeda Galaxy, but not optimal for planetary imaging.
My first task was to figure out the arrangement for an optical train that would incorporate both the 2X Barlow lens and the T3. After studying the components I had on hand, I came up with the idea to use an afocal eyepiece adapter to hold the Barlow lens. Afocal photography is a method of taking pictures with a camera that is located behind an eyepiece. (Imagine the camera looking into the telescope eyepiece in much the same way that a person would.) This is not an ideal arrangement for wide-field photography, but since planets are relatively small, it works fairly well.

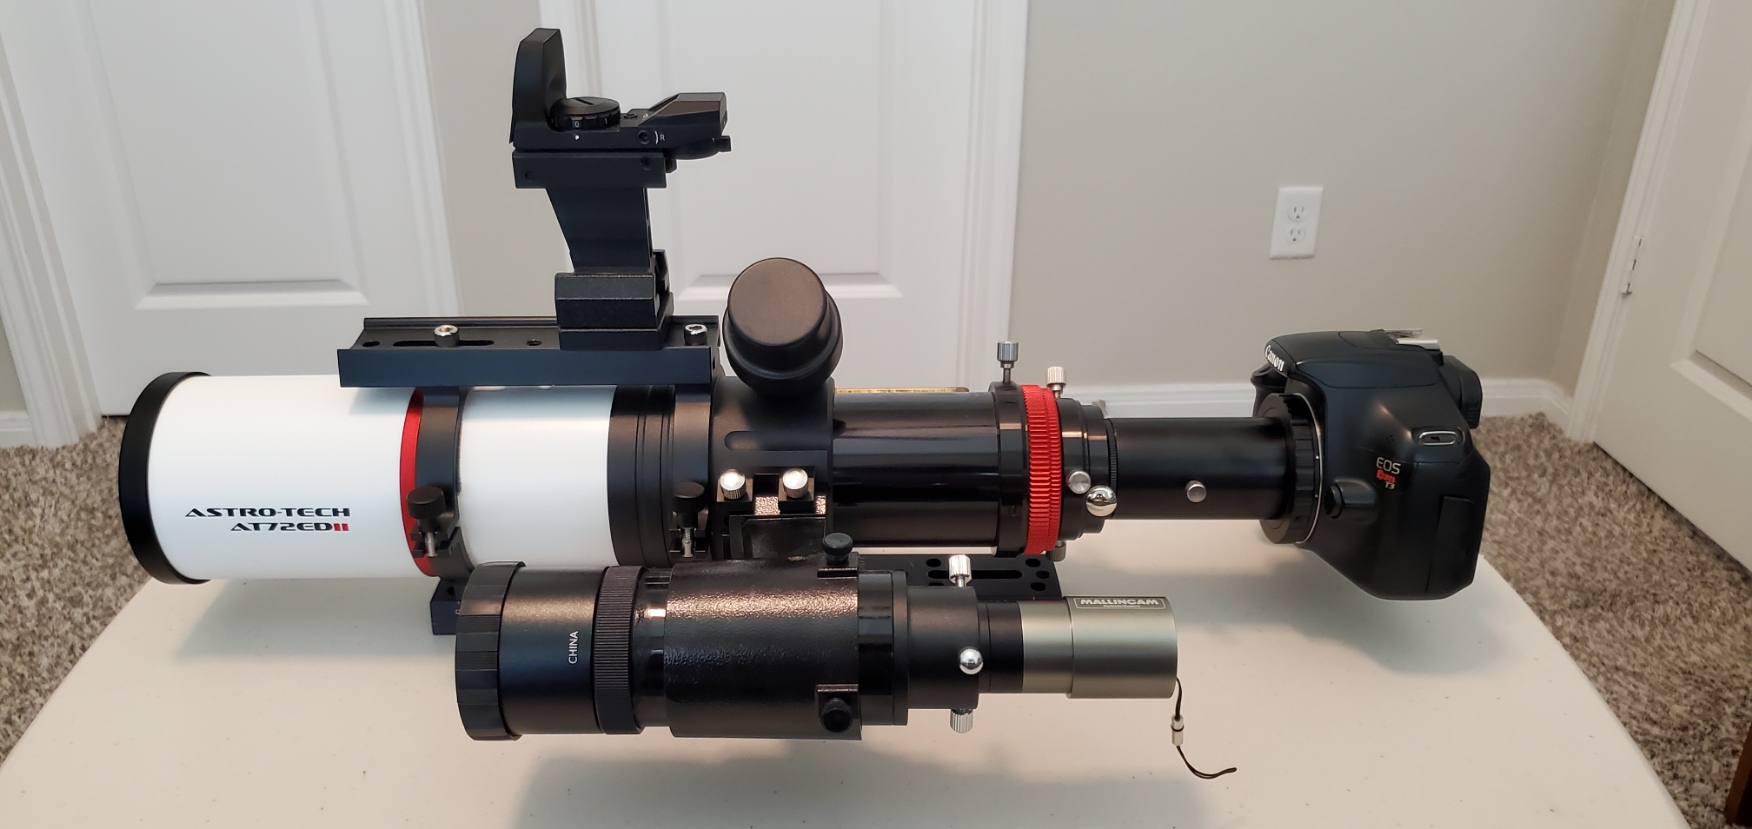
The image above shows the components of my “planetary” optical train. Looking from left-to-right is the 1.25-inch adapter, the afocal eyepiece adapter, the 2X Barlow lens, the T-ring adapter (front), and the Canon EOS Rebel T3 DSLR camera. The focal reducer is not used in this configuration.
The Barlow lens has two parts: the lens assembly and an eyepiece adapter for attaching a 1.25-inch diameter eyepiece. The eyepiece adapter is not needed for this assembly, so I unscrewed it and set it aside.


The 1.25-inch adapter fits into the telescope focuser tube. The afocal adapter fits into the 1.25-inch adapter. The Barlow sits inside the afocal eyepiece adapter. The T-ring screws onto the end of the afocal adapter, and the camera snaps into the T-ring.

Three locking screws located at the end of the focuser tube keep everything firmly in place.
After putting all of this together I had to test whether it worked. There was a possibility that the position of the Barlow would prevent the camera from getting a focused image. I took the scope outside, pointed it at a distant tree, twirled the focuser knob, and everything came into focus!
Image Capture, Conversion, and Stacking
So, with the image train issues worked out, I should be ready to go, right?
Wrong! If something is easy, then you’re probably doing it wrong. Or sometimes you have to do it wrong to get it right. At any rate, I had a few more obstacles to overcome during this imaging session.
As stated above, there was no easy way to capture planetary images using the T3. The EOS Utility software, which I use to control the camera, has a Live View mode that displays on the computer screen what the camera is “seeing.” This mode is helpful when adjusting the exposure settings. It does not, however, have a facility for saving the live video to disk. (There are 3rd-party apps that will do this, but I didn’t want to spend extra money that night.)
While pondering the situation I remembered OBS Studio, a free application that is used for screen recording and live streaming. I use this software at work to record training and demonstration videos. I downloaded and installed it on my laptop and tried recording the Live View screen. It worked perfectly!
But, of course, there was still a problem.
OBS Studio records video in MKV format, an open standard that is meant to be sort of a universal means of storing media. OBS Studio has a “remux” feature that will convert the files to MP4. But MP4 is not supported by stacking software and OBS Studio does not have an option to remux a video into a compatible format.
This is where PIPP comes in. PIPP can take an MP4 file and divide it up into individual frames–either as separate image files, or a video format that is compatible with stacking software.
Before running the video through PIPP, though, I had to crop out the portions that were not part of the final image (e.g., the Live View window boundaries and its controls). I did this by opening the video file in Photoshop, converting the image to a smart object, cropping it, and then exporting the cropped video to another MP4. There are different ways to perform this task, but if Photoshop is your go-to tool, then you can find more detailed instructions on cropping videos here.
I ran the cropped MP4 through PIPP to create individual TIFF images, which were then stacked using AutoStakkert! 3.
AutoStakkert! created a TIFF file that I then pulled into RegiStax 6 for processing and cleanup.
It was a lot of steps, but actually pretty easy. This video by Rami Astro illustrates the process of using PIPP and AutoStakkert!:
The Images
Finally, the images!


The following two images are part of a failed attempt made on October 14, 2022, to obtain larger images by using a regular eyepiece instead of the Barlow. Unfortunately, I forgot to multiply by 2 when I was calculating the relative magnification of the Barlow images above, so I ended up using an eyepiece that projected an image at almost exactly the same magnification. It took so long to get everything set up and running that evening that I didn’t realize my mistake until too late. Oh, well.


Conclusion
I think that, overall, I’ve proven that decent planetary images are possible with my current equipment and software as long as I do not have high expectations. Perhaps someday I will invest in the proper equipment, but for now this will help keep me busy.
Leave a Reply